- What do want to do?
- Find structure azimuth.
- Specify the probe positions.
- Make the first gstar run.
- Make the second gstar run.
- Position the gc1 probe.
- A useful product: acam_dss.fits
- Descriptions by John Caldwell.
What do want to do?
The goal of this exercise is to place HZ44 into the field of view (FOV) of guide probe 1 (gc1). How do I set up for this observation? Assume that all we know at this point is that HZ44 is a very blue (B-V=-0.3) flux standard at celestial position Ra,Dec = 13:23:35.37 +36:08:00.0 J2000.
Find structure azimuth.
Normally we would know the HET structure azimuth to be used when we select a target with htopx. However, in this case I took the position of HZ44 from the web. Hence, because a "gstar" run will require us to input the structure azimuth, I run the following:
   % estimate_azhet_hetq 13:23:35.37 +36:08:00.0 0
     69.620  93.35270

   % cat estimate_azhet_hetq.out
    Ra,Dec = 13:23:35.37 +36:08:00.0
    Approximate AZ = 0
    Track = E
    DEC in floating point (degrees) = 36.133333333
    HET structure azimuth = 69.620
    HET parallactic angle = 93.35270

 Note that I fed the script estimate_azhet_hetq a bogus input AZ value:
   Usage: estimate_azhet_hetq 02:35:27.90 +39:39:52.0 63
   arg1 - RA in sexigecimal format (hh:mm:ss.ss)
   arg2 - DEC in sexigecimal format (+dd:mm:ss.s)
   arg3 - approximate AZ
Specify the probe positions.
How do we use the current probe positions? The gstar script uses the get_probexy.sh code to derive the X,Y position ofthe probe you are interested in (the name of a probe must be one of: gc1,gc2,wf1,wf2).
I can always use a default probe position:
% ls

% get_probexy.sh gc1
 0.00000 -0.16000
To run gstar, we usually want to use the current probe positions. You can do this automatically on mcs as astronomer. If you are another machine, you can dump a part of the htcs "d" dump into a file. Here is an example of a "probes.pos" file:
% ls
probe.pos

% cat probe.pos
-- Guider1 -----
ArmAngle        137.872382
ProbeAngle      325.899759
TelecenX        0.164943
TelecenY        0.000986
---- Guider2 -----
ArmAngle        133.355984
ProbeAngle      133.560615
TelecenX        -0.173019
TelecenY        0.034002
---- WFS1 -----
ArmAngle        135.379046
ProbeAngle      370.109461
TelecenX        0.119984
TelecenY        0.119972
---- WFS2 -----
ArmAngle        135.369688
ProbeAngle      190.136284
TelecenX        -0.119991
TelecenY        -0.119983
You will notice that "probe.pos" is a subset of the ouput we get from a "d" dump on htcs. I require a "probe.pos" file since it seems we are frequently changing the format of the "d" dumps.
% get_probexy.sh gc1
0.164943     0.000986

NOTE: The exact value in "probe.pos" is now being used.
Make the first gstar run.
Now we are ready to make our FIRST run of gstar.
% gstar 13:23:35.37 +36:08:00.0 69.620 gc1

WARNING: We want to be sure that no dss.fits is present
         from a previous run or that image will be used.

Recall:
arg1 - RA  (sexigecimal)
arg2 - DEC (sexigecimal)
arg3 - Azimuth of HET structure (degrees)
arg4 - probe name
An example of what we see during the first part of this gstar run
is shown below:
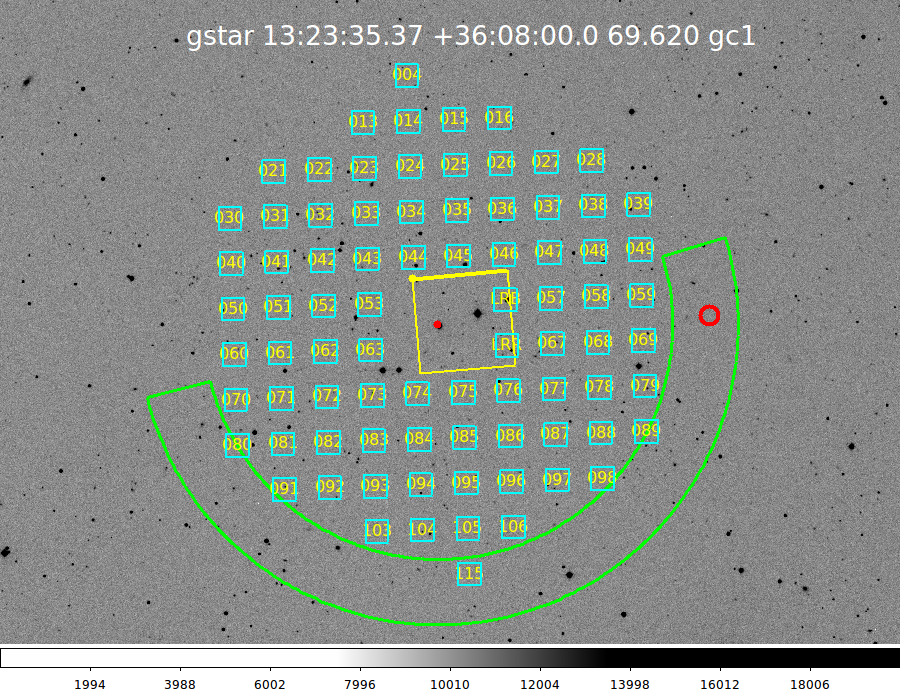 |
Here is my first gstar run. I used the command string:
% gstar 13:23:35.37 +36:08:00.0 69.620 gc1 |
In the first run of gstar, I use the "line" region marker to locate a new Ra,Dec values. I want a value of Ra,Dec that will place the target (HZ44) into the FOV of gc1. I find this by drawing a line from the probe position, through the IHMP center (the location of HZ44!) and extended to the field in the probe annulus area on the other side. The location of that second line segment point should be a good Ra,Dec for the next gstar run. The figure below illustrates how I determine a new Ra,Dec that will place HZ44 in the position of gc1 (see Fig2). The value I derive is 13:24:25.53 +36:07:44.3 (J2000).
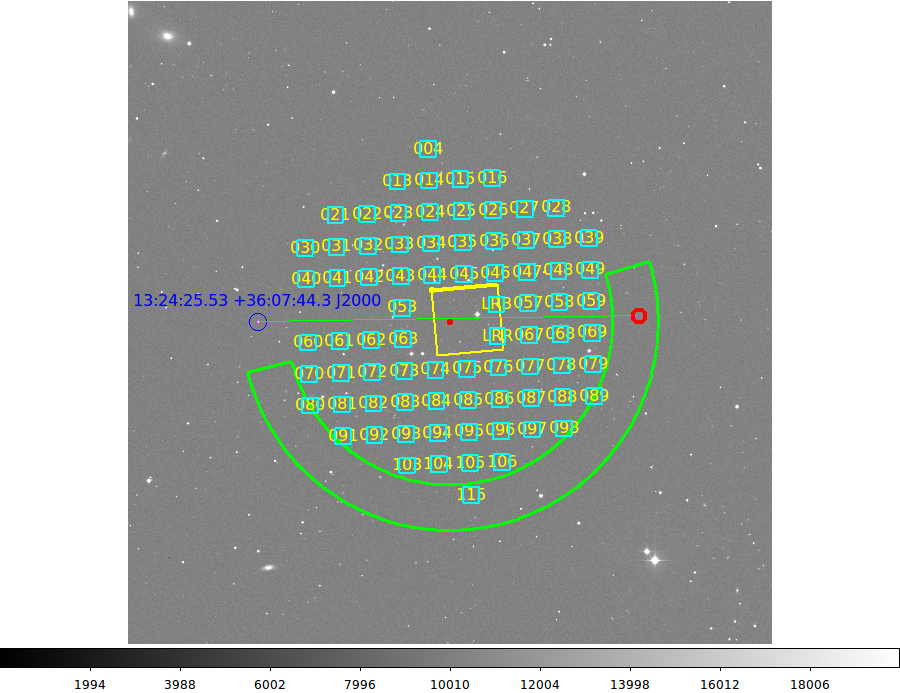 |
| Here I use a line region marker. |
Make the second gstar run.
I make my second (and final) gstar run with the revised Ra,Dec position:
% gstar 13:24:25.53 +36:07:44.3 69.620 gc1I could get away with using the same dss.fits file, but to be sure I get a get centering, I delete everything and run the new job in an empty directory.
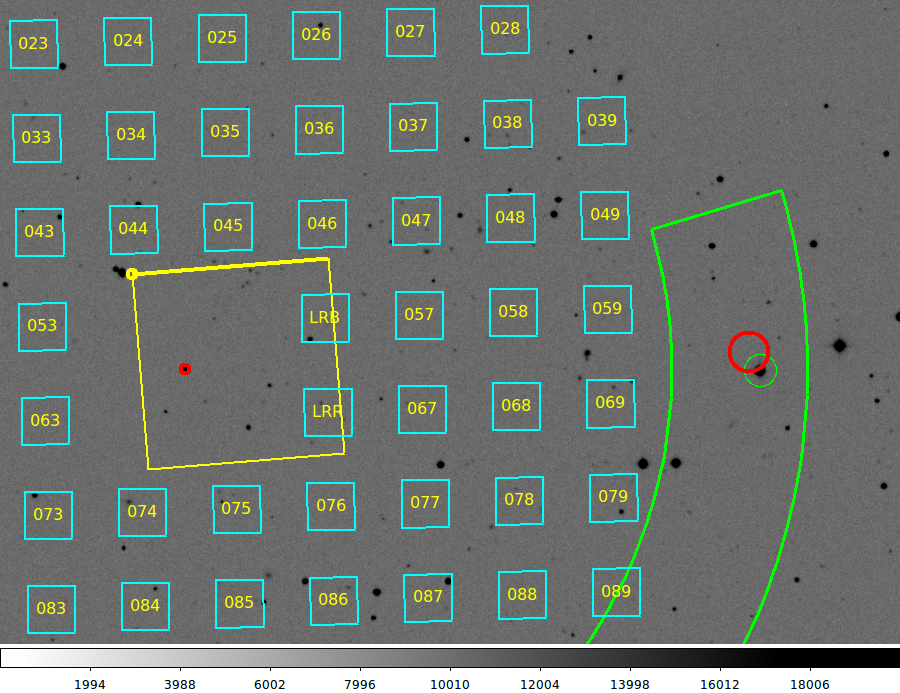 |
| Notice that I set my new Ra,Dec so that a star would be placed at the IHMP center. This would make it easy for the TO to quickly setup on the field using the acam_dss.fits image. Using the revised Ra,Dec means that HZ44 may be slightly displaced from the probe position, so I circle HZ44 with a green circle. This green circle position is used to predict the final gc1 probe position we will need so that HZ44 falls in the gc1 FOV. |
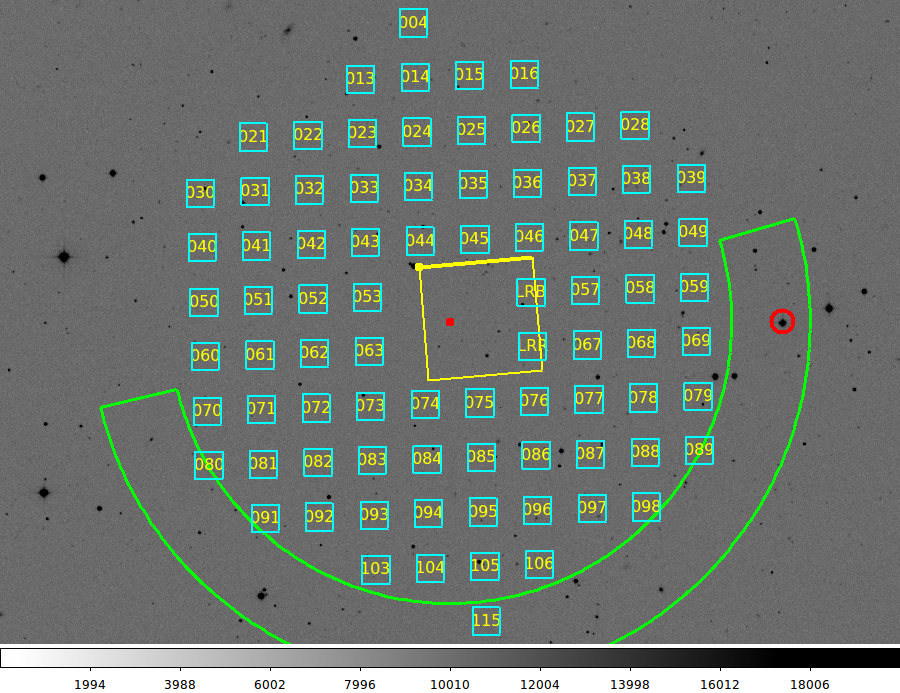 |
| After I specify a revised probe positions (using the green circle in the last figure), I now have the final probe position for gc1 centered on HZ44 (the large red circle above). |
At the end of my gstar run I get the message:
For gc1 star, use x_ang,y_ang = 0.005 -0.163
Position the gc1 probe.
We use the "pmove" script to derive the htcs commands we'll need to move gc1 to desired location:
   To test the validity of the position:
    % gpxytest.sh 0.005 -0.163 gc1
    Y
      -----> Y means "Yes, this is a VALID position"

   % pmove gc1 0.005 -0.163
     syscmd -T -v 'Guider1_set_position( x_ang=0.005, y_ang=-0.163) '
     syscmd -T -v 'pfip_move_probes()'
I click and drag these last two commands into the htcs
window to properly position gc1 for this observation.
A useful product: acam_dss.fits
One thing that any gstar run produces is a FITS file named "acam_dss.fits". This is a FITS image that contains a simulated view of what the TO will see during setup. Specifically, it will be the view when the Ra,Dec sent to gstars (arg1 and arg2) are placed at the IHMP position. Moreover, the acam_dss.fits file has WCS in the header that allows the RA/TO to quickly evaluate the Ra,Dec we should be seeing at any ACAM X,Y position. You can view this image by opening a new ds9, or an even easier way is to just open an additional (tiled) frame in the ds9 window that the gstar run opened for you.
Descriptions by John Caldwell.
Since I developed the gstar method, wrote the code, and wrote the documentation, it could well be that my descriptions will be understoood by perhaps nobody but me. John sent soem useful description for using gstar for two cases: 1) find a guide star, and 2) place a target (like a standard star) on a guide probe. here are his descriptions:
star to get a guidstar onto gc
-------------------------------
 1 choose gcA or gcB, e.g. gcA
 2 run gstar with target radec(2000) az gcA
 3 pick suitable guidstar, preferably not far from current gcA, clickit
   [visually confirming it is in the half-annulus]
 4 gstar reports xy which would put gcA where you clicked
 5 send telescope to center target on acam
 6 move gcA to the (step 4) xy


gstar to get an auxiliary star which enables getting target onto gc
-------------------------------------------------------------------
 1 choose gcA or gcB that you want the target on, e.g. gcA
 2 move gcB now to be diametrical to that gcA
 3 run gstar with target radec(2000) az gcB (not A!)
 4 pick suitable auxstar (auxiliary star), preferably not far
   from current gcB
   [visually confirming it is in the half-annulus]
 5 gstar gives you the radec(2000) of that auxstar
 6 gstar reports xy which would put gcB where you clicked
 7 move gcA now to be diametrical to that reported xy
 8 run gstar AGAIN with auxstar radec(2000) az gcA (not B!)
 9 the target star should appear near gcA, clickit
10 gstar reports xy which would put gcA where you clicked
11 send telescope to center auxstar on acam
12 move gcA to the (step 10) xy
Back to SCO CODES page