ds9_id
Use a ds9 window to view multiple images and mark regions. The
regions will be measured with mido and similar routines to
provide image parameters.
ds9_id a.fits 1.0 2000.0 Y
arg1 - name of input FITS image file
arg2 - low display level (z1)
arg3 - high display level (z2)
arg4 - Y/N for column explanation table
The user marks the regions and hits any key to return
to the calling script. The regions are processed (by mido.sh)
and a table of image parameters is printed. If the command
line specifies "Y" for argument 4, then a brief explanation
of the table columns is also printed.
The header notes in ds9_id:
# View and process an image in ds9
# The basic step of this routine are:
#  1) Assume ds9_open has already been used to open the ds9 gui
#  2) Display the first image and mark a target
#       - use ds9_open and ds9_view for this
#  3) With the first image build a local "id.objects" file.
#       - ise obj_id_build.sh
#  4) Use the "id.objects" to compute MIDO parameters
#     for all images in the input list.
#       - use mido.sh
#  5) Print a summary table of the mido results
#       - use midodata.sh
An improvement in Dec2015
In preparing a photometry example using my NGC7479 images, it occured
to me that I really should store the full ds9 region file for every
region stored with ds9_id. In this way, whether mido or other codes
can interpret the attributes, I have a record that can be used to
repaint the region. Here is an example of how I use ds9_id now.
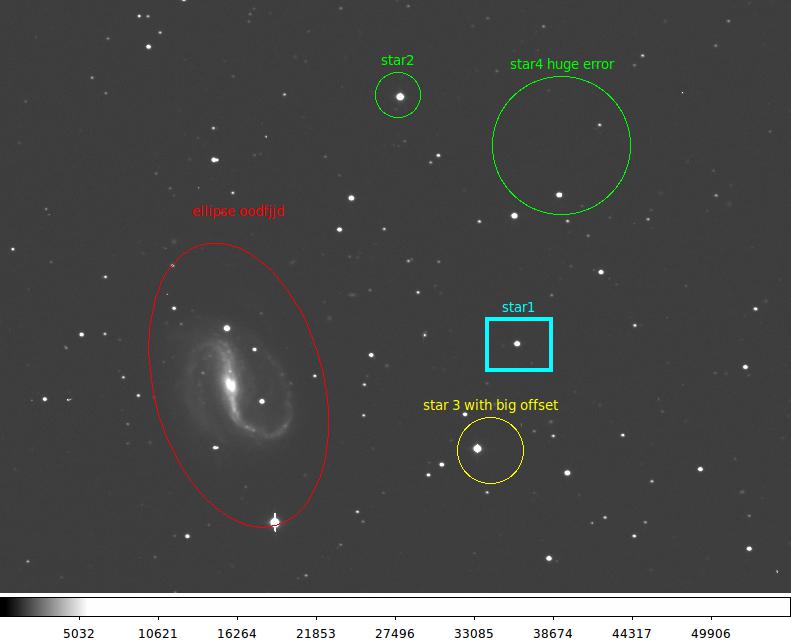 |
An image with rds9 regions that have been recored with
ds9_id. As of Dec2015, the exact region lines are stored
in the *.info files. Hence, if a region has a non-standard
text line (with spaces, non-defualt font type or size, etc...)
this information is recorded. First I displayed the image
with a simple ds9 call, then I ran ds9_id and set the
region region markers. The commands were:
%  ds9 Rsco3228.fits &
%  ds9_id Rsco3228.fits Y Y
The second "Y" argument indicated that I wanted a
jpeg file of the final image. This made the image file
for this figure.
|
After I have run ds9_id, a set of image paramters, computed with
mido.sh, will have benn computed and stored in the *.info file
for all recorded regions. I can used the "ds9_midomark" routine
to paint in the centroid positions derived for each region marker.
An example of such a run, following the case illustrated above, is shown below:
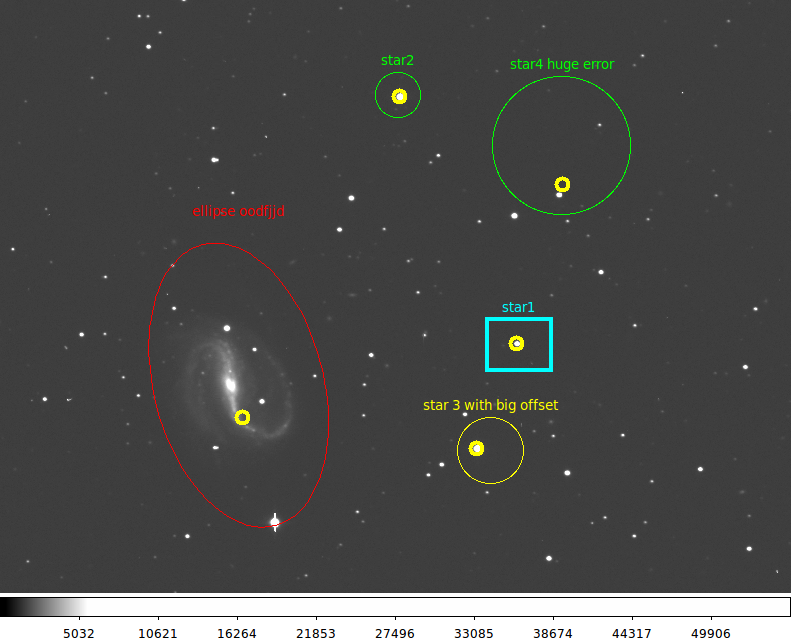 |
I used the following command to add the small yello circles
that indicate the image (intensity-weighted) centroid for each region:
% ds9_midomark Rsco3228.fits &
We see that in the cases of very large apertures, the derived
centroid may not be what is desired. The large number of sky
pixels in such apertures may dilute the signal of the desired
source and cause the X,Y centroid to be located well off of the
position of our intended target.
|
Back to SCO CODES page